Setting up Code Analysis in Visual Studio 2017 projects
In older versions of Visual Studio, FXCop was the standard for static analysis in .NET. In Visual Studio 2017, along with the release of the roslyn compiler, the landscape is different. Static analysis is no longer something you install on the machine and configure in the project, it’s delivered via nuget packages. In this post, I’ll lay out how I suggest setting up static analysis for C# projects. The setup should work equally well for Full Framework and .NET Core.
Which analyzers to use
The first question to answer is which code analyzers to use for your project. Before we just had FXCop but now you can google for “roslyn analyzers” and find a plethora of options. I typically stick to the stock Microsoft options but there are plenty of third-party options too like Style Cop.
In this example, I’ll use the Microsoft.CodeAnalysis.FxCopAnalyzers, which is a meta package of four other analyzer packages:
- Microsoft.CodeQuality.Analyzers
- The bulk of the “classic” FXCop errors are here. For instance, implementing
IDisposableproperly and passing URIs instead of strings are both checked in this package.
- The bulk of the “classic” FXCop errors are here. For instance, implementing
- Microsoft.NetCore.Analyzers
- .NET core specific warnings/errors appear here, but many are more generic like requiring
ICultureInfoto be passed to methods that can accept it.
- .NET core specific warnings/errors appear here, but many are more generic like requiring
- Microsoft.NetFramework.Analyzers
- Full framework .net warnings are checked here like handling
ISerializablecorrectly.
- Full framework .net warnings are checked here like handling
- Text.Analyzers
- This package provides some basic spell checking (disabled by default).
Install and configure analyzers
To get started, install the Microsoft.CodeAnalysis.FxCopAnalyzers nuget package into all projects in your solution. This by itself will generate warnings and do the code analysis using the default ruleset. I want to take it one step further to use shared rulesets for all projects in the solution.
Add shared rulesets
To utilize shared rulesets, edit the csproj files to reference a shared analyzer ruleset. This file will be used to configure which rules are enabled/disabled in your solution. I prefer to have two ruleset files, one for production source code and one for tests so that I can be flexible on the rules I use to analyze test code.
-
Edit the projects by adding the following lines to the csproj. They can go anywhere but I typically add them underneath the TargetFramework/RootNamespace property group. I use a tools folder at the root of my git repository but you can put the ruleset file anywhere.
<PropertyGroup> <CodeAnalysisRuleSet>..\..\tools\Source.ruleset</CodeAnalysisRuleSet> </PropertyGroup> -
Add a ruleset file in the location specified above. The exact contents of the ruleset file will vary but if you use FxCop analyzers a good place to start is with this default file - https://gist.github.com/dontjee/4a151dea7bc1169f9dd051da70bec35e. It enables some of the most important rules as warnings.
-
Repeat the process above for test projects, or any other projects you want to use different rulesets, using a different ruleset file.
 <PropertyGroup>
   <CodeAnalysisRuleSet>..\..\tools\Tests.ruleset</CodeAnalysisRuleSet>
 </PropertyGroup>
Build and fix/ignore warnings
Now that we’ve configured the ruleset files, the next step is to do a rebuild of the solution and fix or ignore any warnings that pop up. One rule that I often disable is CA2007 Do not directly await a Task without calling ConfigureAwait. This makes sense when building libraries to be consumed in other projects but when building applications, this rule isn’t necessary. To disable the rule follow the steps below
- Find the rule in the analyzer list under Dependencies->Analyzers->[The-Analyzer-Name]. In the case of
CA2007, the analyzer name isMicrosoft.CodeQuality.Analyzers.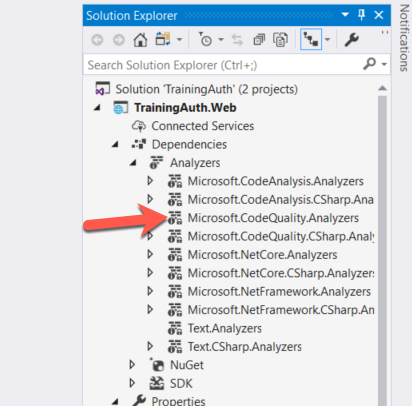
-
Under the code analyzer, find the rule you want to disable and right-click on it and set the
Rule Set SeveritytoNone.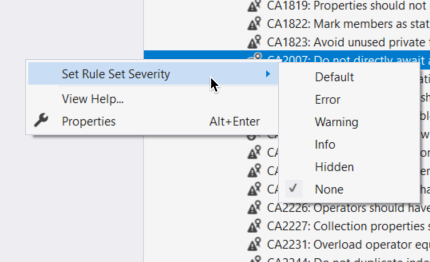
This adds the following block to the corresponding ruleset file to disable the rule:
 <Rules AnalyzerId="Microsoft.CodeQuality.Analyzers" RuleNamespace="Microsoft.CodeQuality.Analyzers">
   <Rule Id="CA2007" Action="None" />
 </Rules>
Repeat the process above for all rules you wish to disable or fix the warnings that show up. Once that’s done, the code analysis setup is complete for your solution.
Extra Credit - set up builds to fail on analyzer warnings
Now that you have a clean build with no warnings I suggest configuring the continuous build (I hope you have one!) to report warnings as errors so that the build will fail if any new code analysis violations show up. To do this, add the following MSBuild property to the compile step of your build - /p:TreatWarningsAsErrors="true".